|
|
|
|
Timesheet users (and their alternates) utilize the timesheet to record hours and comments for the work they are doing. Users can navigate to their timesheet via the Time menu option. Users can also navigate to their timesheet via one of the many timesheet lists (available on a number of system dashboards and on the Time >> List screen).
Before a user can enter time, they may need to review and manage which projects will appear on their timesheet. Depending on how your site is managed, project managers may control which projects are available by making explicit Assignments, or user's may need to "Self Assign" themselves to a project. From the timesheet, you can click on the My Projects button to manage the project list. See Managing List of Projects for more information.
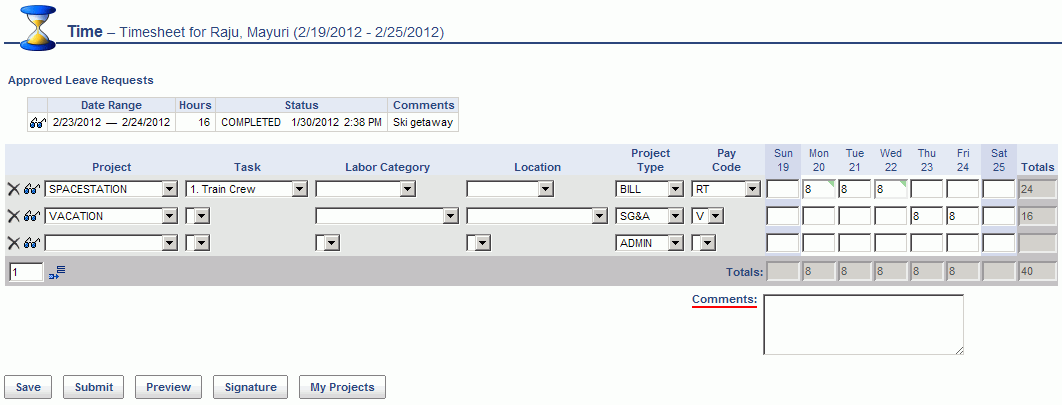
The Unanet administrator will control the look of your timesheet in terms of the number of days that will appear. An example timesheet appears below:

Using the various drop down lists, identify the projects, tasks, pay codes etc for each entry and supply a number of hours for each.
Users can also record Comments for each cell in the Comments text entry field. New rows can be added to the timesheet using the ![]() control if additional lines are required. Clicking on the Save button will save the timesheet entries. Depending on how your system is configured, your timesheet may look slightly different than the example above.
control if additional lines are required. Clicking on the Save button will save the timesheet entries. Depending on how your system is configured, your timesheet may look slightly different than the example above.
See Working With Timesheets for more in depth information about the timesheet and available options.
At the end of a time period, you will be required to submit your timesheet. Again, depending on your site's configuration, your timesheet may require approval by one or many Managers or Project Approvers.
To create a new timesheet for your next time period, click on the ![]() link, available on several screens which display a list of timesheets, including the Time >> List screen and various dashboard.
link, available on several screens which display a list of timesheets, including the Time >> List screen and various dashboard.